Cleaning a Honeywell fan is a simple process that can be done with a few common household items. Honeywell fan cleaning can be done using a soft cloth or brush to remove dust and debris from the fan blades and grille.
Additionally, a vacuum cleaner can be used to remove any loose dirt or dust. Regular cleaning of your Honeywell fan will help to maintain its performance and extend its lifespan. Having a clean and well-functioning fan in your home not only helps to cool the air but also removes impurities and improves air circulation.
However, over time, dust and debris can accumulate on the fan blades and grille, reducing its efficiency. Regular cleaning is necessary to keep your Honeywell fan working effectively. We will guide you through the process of cleaning a Honeywell fan, providing you with simple steps to ensure optimal performance. By following these instructions, you can keep your fan running smoothly and enjoy a refreshing breeze all summer long.
Why honeywell fan cleaning is Important?
Regularly cleaning your Honeywell fan is crucial for maintaining its performance and ensuring longevity. Proper cleaning helps prevent dust buildup, improves air quality, and keeps the fan functioning at its best.
Preventing Dust Buildup
Dust is an inevitable part of our indoor environment. Over time, it accumulates on the blades, grills, and other parts of your Honeywell fan. Neglecting to clean the fan regularly can result in a thick layer of dust, hindering the fan’s efficiency.
Prolonged dust buildup can obstruct the airflow, making your fan less effective in circulating cool air during summer or keeping warm air flowing in winter. This can lead to decreased comfort and increased energy consumption as the fan works harder to compensate.
Regular cleaning of your Honeywell fan ensures that dust is removed, allowing for optimal airflow and better performance. It helps the fan operate efficiently, reducing the strain on its components and extending its lifespan.
Improving Air Quality
Clean air is essential for a healthy living environment. When your Honeywell fan collects dust and dirt, it can become a breeding ground for allergens, such as pollen, pet dander, and mold spores. As the fan circulates the air, these particles can be released back into the room, compromising the air quality.
By regularly cleaning your Honeywell fan, you can minimize the presence of these allergens and improve indoor air quality. This is particularly important for individuals with allergies, asthma, or respiratory sensitivities.
Ensuring Proper Functionality
A well-maintained Honeywell fan operates more efficiently, ensuring that you get the most out of your appliance. Cleaning the fan regularly prevents debris from accumulating on the motor, blades, and other internal components, which can lead to reduced performance or even damage.
When dust and dirt build up inside the fan, they can hinder the smooth rotation of the blades, resulting in increased friction and strain on the motor. Regular cleaning ensures that the fan runs smoothly, providing consistent airflow and quiet operation.
To ensure your fan works properly, refer to the manufacturer’s instructions for the recommended cleaning frequency and methods. By adhering to these guidelines and making cleaning a part of your regular maintenance routine, you can enjoy optimal performance and long-lasting reliability from your Honeywell fan.
Tools Needed for Honeywell Fan Cleaning
If you want your Honeywell fan to maintain its optimal performance and keep the air in your home fresh and cool, regular cleaning is essential. But what tools do you need to effectively clean your Honeywell fan? In this blog post, we’ll explore the important tools needed for cleaning your Honeywell fan, including a soft cloth or sponge, a vacuum cleaner, and a brush.
Soft Cloth Or Sponge
A soft cloth or sponge is a must-have tool when it comes to cleaning a Honeywell fan. These tools are gentle on the fan’s surface and can effectively remove dust and dirt. Simply dampen the cloth or sponge with water and wipe down the blades and outer casing of the fan. Remember to unplug the fan before cleaning and avoid using abrasive materials that could scratch the fan’s surface.
Vacuum Cleaner
A vacuum cleaner with a brush attachment is another useful tool for cleaning a Honeywell fan. The brush attachment helps to loosen and suck up any stubborn dust and debris that may have accumulated in the fan’s vents or motor. Gently run the brush attachment along the vents and other hard-to-reach areas of the fan to remove any dirt. The vacuum cleaner will ensure a thorough cleaning, leaving your fan looking and functioning at its best.
Brush
In addition to a vacuum cleaner, a brush is a handy tool for cleaning a Honeywell fan. A soft-bristled brush, such as a paintbrush or old toothbrush, can be used to reach tight spaces and corners that the cloth or sponge may not be able to access. Use the brush to sweep away any remaining dust or dirt from the fan’s blades, vents, and other intricate areas. The brush will help you get into every nook and cranny, ensuring a more thorough cleaning.
By using these essential tools—a soft cloth or sponge, vacuum cleaner, and brush—you can easily clean your Honeywell fan and keep it in top-notch condition. Regular cleaning not only helps maintain the fan’s performance but also improves the air quality in your home. So, grab your cleaning tools and get started on cleaning your Honeywell fan today!
Step-by-step Guide to Honeywell Fan Cleaning
Cleaning a Honeywell fan is an essential maintenance task that keeps it running efficiently and prolongs its lifespan. Dust, dirt, and debris can accumulate on the fan blades and grills, impacting their performance and air circulation. To help you with this chore, we have put together a step-by-step guide on cleaning your Honeywell fan. By following these simple instructions, you’ll have your fan looking and functioning like new in no time.
Unplug The Fan
Before you begin cleaning the Honeywell fan, it is crucial to unplug it from the power source. This ensures your safety and avoids any potential accidents. Always remember to prioritize your well-being when handling electrical appliances.
Remove The Front Grill
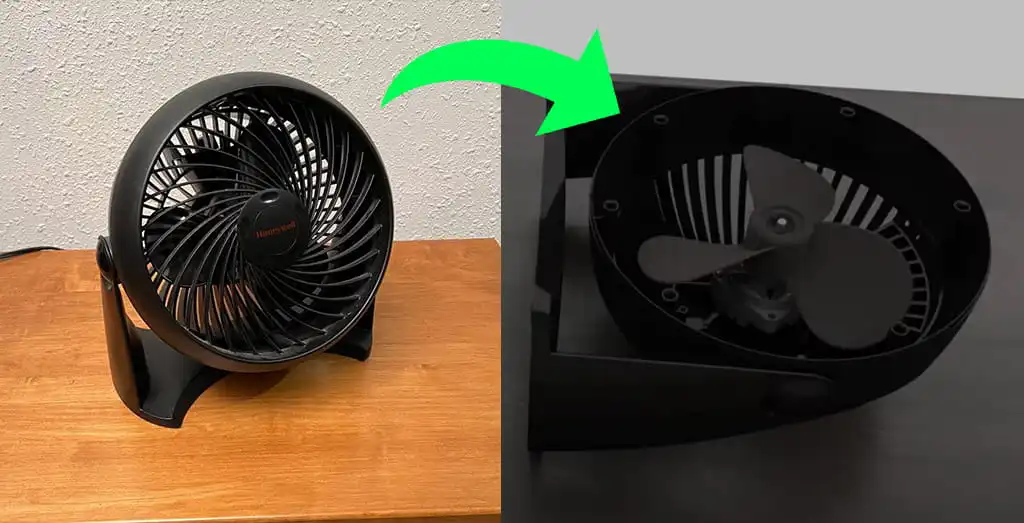
To access the fan blades, you need to remove the front grill. Most Honeywell fans have grill clips or screws that hold the grill in place. Carefully detach the grill and set it aside for cleaning.
Clean The Fan Blades
Now that you have exposed the fan blades, it’s time to clean them. Start by using a soft brush or a cloth to gently remove any loose debris and dust. For more stubborn dirt, you can dampen the cloth with a mild cleaning solution. Be cautious not to get any liquid into the motor or electrical components.
Wipe The Grill And Casing
While your fan blades are drying, focus on wiping the grill and casing. Use a damp cloth or sponge to clean the grill thoroughly, removing any accumulated dust and dirt. Additionally, wipe down the casing of the fan to ensure a complete cleaning.
Reassemble The Fan
After the fan blades, grill, and casing have fully dried, you can reassemble the fan. Make sure everything is securely in place before plugging it back in. Remember to keep the area around the fan clean and free from obstructions to maximize its performance.

Tips For Maintaining Your Honeywell Fan’s Cleanliness
Cleaning a Honeywell fan regularly is essential to ensure optimal functionality and to keep the air in your space clean and fresh. neglecting its cleanliness can lead to the accumulation of dust, debris, and allergens, potentially affecting the fan’s performance and your respiratory health. Fortunately, with a few simple cleaning tips, you can keep your Honeywell fan running smoothly and enjoy a healthier environment.
Regular Dusting
Dusting your Honeywell fan regularly is crucial in maintaining its cleanliness and preventing the accumulation of dust and other particles. Dusting the exterior of the fan and its blades can help remove surface contaminants that may hinder its performance. To effectively dust your Honeywell fan, you can follow these steps:
- Turn off and unplug the fan for safety.
- Use a microfiber cloth or a soft, lint-free cloth to wipe down the exterior of the fan, removing any visible dust or dirt.
- Gently wipe the blades and any other accessible parts of the fan using the cloth or a soft brush to dislodge any trapped debris.
- If the fan has protective grills, carefully remove them and clean them separately to ensure thorough dust removal.
- Once you’ve finished dusting, plug in the fan and turn it on to allow air circulation, helping to remove any residual dust.
Using Filters
Utilizing filters in your Honeywell fan can significantly improve its cleanliness and air quality. Filters can trap dust, pollen, pet dander, and other airborne particles, preventing them from circulating back into the room. To make the most of your fan’s filter capabilities, follow these steps:
- Check if your Honeywell fan has a built-in filter or if it’s compatible with additional filter accessories.
- If your fan has a built-in filter, refer to the user manual for instructions on how to clean or replace it as recommended by the manufacturer.
- If your fan is compatible with extra filters, consider investing in them and replacing them regularly to ensure optimal performance.
- Clean or replace the filters according to the manufacturer’s guidelines, which usually involve rinsing, air drying, or replacing them at specified intervals.
Keeping The Fan In A Clean Environment
Prevention is key to keeping your Honeywell fan clean. By maintaining a clean environment around the fan, you can minimize the presence of dust and dirt that may settle on its surface and impede its performance. Here are some tips:
- Vacuum and clean the room regularly to reduce dust and airborne particles.
- Avoid placing the fan near sources of dust or dirt, such as open windows, construction areas, or shedding pets.
- Consider using an air purifier or a humidifier in the room to help reduce airborne contaminants.
- Regularly replace or clean any filters in your home’s HVAC system to reduce the overall dust levels in your space.
By incorporating these cleaning tips into your routine, you can maintain the cleanliness of your Honeywell fan and enjoy refreshed air circulation in your living or working space. Remember, a clean fan not only improves the performance of the appliance but also contributes to a healthier environment for you and your loved ones.

Find the Best Honeywell fan
Cleaning Common Fan Issues
Learn how to easily clean your Honeywell fan and solve common fan issues. Keep your fan running smoothly and efficiently with these simple cleaning tips.
Noisy Operation
One of the common issues that can degrade the performance of your Honeywell fan is noisy operation. Nothing is more annoying than a fan that produces loud and distracting noises when in use. Luckily, cleaning a Honeywell fan can often alleviate this problem.
When a fan accumulates dust and dirt over time, it can cause the blades to become unbalanced, resulting in an irritating noise. To remedy this, start by unplugging the fan and placing it on a flat surface. Use a soft cloth or a vacuum cleaner with a soft brush attachment to remove any visible dust from the blades, the fan housing, and the surrounding areas.
A thorough cleaning of the fan blades is essential to reduce noise and ensure optimal performance. Gently wipe down each blade, being careful not to bend them. For hard-to-reach areas, a cotton swab can be useful. Once you have removed all the dust, plug the fan back in and check for any improvement in its noise level.
Fan Not Oscillating
Another common issue that you may encounter with your Honeywell fan is when it fails to oscillate. Oscillation is the back-and-forth movement of the fan that helps distribute the airflow throughout the room. If your fan is not oscillating, it may need a cleaning.
Unplug the fan and inspect the oscillation mechanism. Dust and debris can accumulate in the mechanism, preventing it from operating smoothly. To clean it, use a cotton swab or a soft brush to remove any visible dirt. Take care not to apply excessive force, as it may cause damage to the mechanism.
Additionally, it’s important to check the fan’s base to ensure that it is securely attached. If the fan is not sitting properly on its base, it may not be able to oscillate effectively. Adjust the fan’s position and make sure it is securely locked in place before plugging it back in and testing its oscillation function.
Regular maintenance, including cleaning a Honeywell fan, can help resolve common issues and ensure it operates at its best. By addressing noisy operation and non-oscillation problems, you can continue to enjoy the refreshing airflow provided by your Honeywell fan.
Precautions To Take When Cleaning Your Honeywell Fan
Care for your Honeywell fan with these precautions for cleaning it effectively. Ensure minimal dust buildup by gently wiping the blades and grill with a soft cloth or brush. Regular cleaning helps maintain the fan’s performance and prolong its lifespan.
Cleaning a Honeywell fan regularly is essential to keep it running efficiently and provide you with a cool and comfortable environment. However, it’s important to take certain precautions to ensure the safety of both yourself and the fan. In this section, we will discuss two important precautions to keep in mind when cleaning your Honeywell fan: avoiding direct water contact with the motor and using caution when working with electrical components.
Avoid Using Water Directly On The Motor
One of the most important precautions to remember when cleaning a Honeywell fan is to avoid using water directly on the motor. The motor is the heart of the fan and is responsible for its proper functioning. Water can damage the motor and lead to malfunctioning or even complete failure of the fan.
To clean the fan without risking damage to the motor, start by unplugging the fan from the power source. Then, use a soft cloth or brush to gently remove any dust or debris from the motor area. Avoid using excessive force or harsh chemicals as this may cause damage as well. It’s recommended to refer to the Honeywell fan’s user manual for specific cleaning instructions.
Use Caution When Working With Electrical Components
When cleaning your Honeywell fan, it’s crucial to use caution when working with electrical components to ensure your safety and prevent any accidents. Before starting the cleaning process, always disconnect the fan from the power source to avoid any risk of electric shock.
Take extra care when handling the fan’s electrical components, such as the power cord or control panel. Avoid pulling or tugging on the cord forcefully as this can damage the wiring and compromise the fan’s safety. Instead, gently wipe the power cord and control panel with a slightly damp cloth to remove any dirt or stains.
Remember, safety should be your top priority when cleaning a Honeywell fan. By following these precautions, you can ensure the longevity and optimal performance of your fan while keeping yourself protected.
Related Post: How to Get Sharpie Out of Carpet
Ensuring The Longevity Of Your Honeywell Fan
To ensure your Honeywell fan lasts longer, proper cleaning is essential. Regularly removing dust and debris from your fan will help maintain its functionality and performance over time.

Frequently Asked Questions For Honeywell Fan Cleaning
How Do You Take Apart A Honeywell Fan To Clean It?
To clean a Honeywell fan, follow these steps:
1. Unplug the fan and remove any accessories or filters.
2. Use a soft cloth or sponge with mild soap and water to wipe down the fan’s exterior.
3. Use a vacuum or brush attachment to remove dust from the fan’s grills and blades.
4. For tough grime, use a mixture of water and vinegar or a non-abrasive cleaner.
5. Allow the fan to dry completely before reassembling and plugging it back in.
How Do I Clean A Honeywell Tower Fan?
To clean a Honeywell tower fan, start by turning off the unit and unplugging it. Use a soft cloth or brush to gently wipe the exterior. For the blades, use a vacuum brush attachment, or a damp cloth if needed.
Avoid getting the motor wet.
How Do You Clean A Fan That Doesn’t Come Apart?
To clean a fan that doesn’t come apart:
1. Turn off and unplug the fan.
2. Use a vacuum cleaner with a brush attachment to remove dust from the grill and blades.
3. Wipe the grill and blades with a damp cloth.
4. Use a cotton swab dipped in rubbing alcohol to clean hard-to-reach areas.
5. Let the fan dry completely before plugging it back in.
How Do I Clean My Honeywell Heater Fan?
To clean your Honeywell heater fan, first, unplug the unit. Then, use a soft cloth or brush to remove dust from the fan blades and grille. You can also use a handheld vacuum or compressed air to remove any stubborn debris.
Be sure to clean regularly for optimal performance.
How Often Should I Clean My Honeywell Fan?
It is recommended to clean your Honeywell fan every 3-6 months to maintain optimal performance.
Conclusion
Regular cleaning of your Honeywell fan is essential to maintain its performance and extend its lifespan. By following the simple steps outlined in this blog post, you can effectively remove dirt, dust, and debris from your fan, ensuring optimal airflow and a cleaner environment.
Remember to unplug the fan before cleaning and use gentle, non-abrasive materials. Keep your Honeywell fan clean and enjoy fresh, cool air all year round.


Pingback: How to Clean a Coffee Maker Without Vinegar: The Ultimate Guide 2024 - Tidyfixit
Pingback: 5 Easiest Ways to Clean Grout Without Scrubbing: Simple and Effective Methods - Tidyfixit
Pingback: How to Stop a Blanket from Shedding: 3 Tips to get rid of Shedding Blanket - Tidyfixit